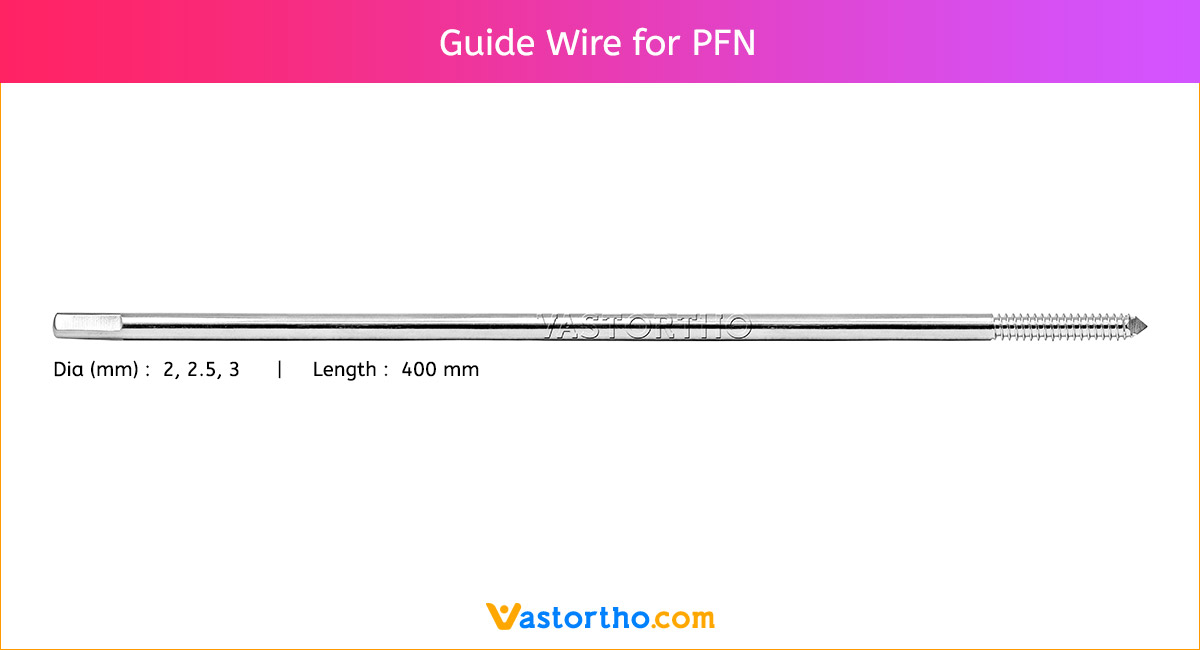
Guide Wire PFN Specification, Uses, Sizes and Surgical Techniques.

Guide Wire PFN

A Guide Wire is a thin, flexible, medical wire inserted into the body to guide a larger instrument. Our Guide Wire PFN is made from finest quality of SS 316L material to ensure highest quality. Guide Wire PFN Diameter is 2mm, 2.5mm, 3mm and length is 400 mm.

Most nails are inserted over a guide wire. Reaming is always performed over a guide wire.
The Guide Wire PFN is inserted under X-ray control.

In order to facilitate passing the guide wire across the fracture site, the fracture should be adequately aligned. It may be easier to pass the guide wire if the tip is angulated.

If the fracture ends cannot be sufficiently aligned for a guide wire to passed, an aiming device may be inserted into the proximal fragment (after reaming if necessary) to manipulate the proximal fragment so that the guide wire PFN can be passed into the distal fragment.

The correct length of the nail is determined by comparing a second guide wire of the same length to the one that has been inserted. The correct placement of the guide wire PFN in the distal canal should be assessed via image intensifier. The tip of the second guide wire must be positioned at the entry point in the bone.

Guide Wire PFN Use in Intramedullary nailing

Guide wire insertion

Hand reamer
Entry site preparation with one of the techniques usually permits insertion of the guide wire PFN into the diaphyseal medullary canal. If cancellous bone remains in the way, complete the entry with a hand reamer. These instruments (in diameters of 6,7 and 8 mm ) are also helpful for old fractures and non-unions, when the medullary canal is plugged with callus.

Ball tip guide wire
Once the proximal metaphysis is breached, pass a ball tip guide wire down the medullary canal into the distal metaphysis. This requires fracture reduction. If reduction is difficult or the fracture is comminuted, special efforts may be required.

Bending the guide wire
Slightly bending the guide wire 10-15 mm above its tip is helpful for two reasons:

1.  Passing through the fracture site into the distal fragment is easier, since rotation of the wire redirects its tip.
2. It also facilitates the proper position of the tip in the distal metaphysis.

A guide wire PFN with its ball a little proximal to the end, allows the bend to be placed beyond the ball, so that it cannot jam inside a cannulated reamer.

Fluoroscopic control
Use fluoroscopy to check that the guide wire is positioned above the center of the ankle joint.

Determination of nail length

Nail length
Nail length is estimated preoperatively, but intraoperative measurement is more precise. Use a radiographic ruler, provided with the nail’s instruments. With the fracture reduced, measure the distance from the planned nail entry site to just above the ankle joint.

Select a nail that extends from the distal tibia to the entry site without protruding above the bone surface. Nail length may be critical for distal fractures. Some nails have proximal extensions of different lengths, that can be added after insertion to correct for an excessively short nail.

If there is no radiographic ruler and/or image intensifier available, a simple, clinical, intraoperative length measurement is advised. With the intramedullary guide wire PFN in proper position, place a second guide wire of equal length at the entry portal and measure the difference in length between the two wires

Reaming and determination of nail diameter

Reaming
Insert the cannulated, flexible-shaft reamer over the ball-tipped guide wire.
Begin with an end-cutting reamer and proceed sequentially to larger reamer diameters, usually in increments of 0.5 mm. Protect the soft tissues at the entry site during this process with a reamer sleeve, as shown, or suitable retractors.

Do not force the reamer! While advancing, intermittently pull back a little to clear debris from the medullary canal.
A chattering sensation indicates that the reamer is in contact with the internal cortical surface. A millimeter or two of additional reaming usually permits passage of an appropriate diameter nail.

Choosing nail diameter
A radiographic gauge, helps assess the medullary canal diameter. Check both AP & lateral views.
The nail diameter should be large enough to provide sufficient strength and durability of both nail and locking screws. Consult the nail manufacturer’s instructions. Usually a 10 mm nail is sufficient. Reaming should be to 0.5 to 1.5 mm greater than nail diameter, since the medullary canal is not perfectly straight.

Preparing for nail insertion
Cannulated nails are inserted over appropriate guide wires. No wire is used for a solid nail. The ball-tipped, or significantly bent, guide wire tibia used for reaming may be too big to remove through a given cannulated nail. If so, the wire must be replaced before the nail is inserted. A plastic medullary exchange tube is available for exchanging guide wires. Pass the medullary tube over the reaming guide wire and all the way passed the fracture site. Hold it in place while removing the reaming guide wire.

Insert the nailing wire through the tube, and confirm that it is properly positioned in the distal tibia (AP and lateral x-rays). Then remove the medullary exchange tube.

Insertion of the cannulated nail

Nail insertion
With adequate reduction and sufficient over-reaming, it should be possible to insert the cannulated nail over the guide wire PFN by hand, or with gentle hammering. Ensure that reduction is maintained as the nail crosses the fracture. If insertion is difficult, correct the reduction and/or remove the nail and ream to a larger diameter.

Make sure that the proximal end of the nail is below the surface of the bone at the entry site, to decrease the risk of knee pain. Careful choice of nail length may be necessary, particularly for distal fractures, to ensure both distal fixation and proper length proximally.

The tip of the nail should be placed in the center of the distal tibia, approximately at the level of the physeal scar (denser bone). Distal placement of the nail is particularly important for fractures below the medullary isthmus. Proper fracture alignment must be maintained by the surgeon, since at this level, passage of the nail does not reduce the fracture.

Pitfalls
The nail should advance into the medullary canal with each tap of the hammer. If resistance is encountered, it may be caused by the wrong entry point, or the tip of the nail hitting the cortex of the distal fragment.
Forced hammering may cause fracture comminution, nail incarceration, or twisting of the nail.

Do you have any questions for Guide Wire PFN? Please fill this form we will get in touch with you shortly.

Name(Required)
This field is for validation purposes and should be left unchanged.

More Products from Pins Wires Staples

Guide Wire PFN Contraindications

Contraindications may be qualified or total, and need to be taken into consideration when evaluating the prognosis in each case. The physician’s education, training and professional judgement must be relied upon to choose the most appropriate device and treatment. Conditions presenting an increased risk of failure include:

  • Any active or suspected latent infection or marked local inflammation in or about the affected area.
  • Compromised vascularity that would inhibit adequate blood supply to the fracture or the operative site.
  • Bone stock compromised by disease, infection or prior implantation that can not provide adequate support and/or fixation of the devices.
  • Material sensitivity, documented or suspected.
  • Obesity. An overweight or obese patient can produce loads on the implant that can lead to failure of the fixation of the device or to
    failure of the device itself.
  • Patients having inadequate tissue coverage over the operative site.
  • Implant utilization that would interfere with anatomical structures or physiological performance.
  • Any mental or neuromuscular disorder which would create an unacceptable risk of fixation failure or complications in postoperative care.
  • Other medical or surgical conditions which would preclude the potential benefit of surgery.
  • All associated diseases which could endanger the function and success of the Guide Wire PFN.

Warnings and Precautionary for Guide Wire PFN

Before using Guide Wire PFN, the surgeon and ancillary staff should study the safety information in these instructions, as well as any product-specific information in the product description, surgical procedures and/or brochures.

Guide Wire PFN is made from medical grade materials and are designed, constructed and produced with utmost care. These quality Guide Wire PFN assure best working results provided they are used in the proper manner. Therefore, the following instructions for use and safety recommendations must be observed.

Improper use of  Guide Wire can lead to damage to the tissue, premature wear, destruction of the instruments and injury to the operator, patients or other persons.

It is vital for the operating surgeon to take an active role in the medical management of their patients. The surgeon should thoroughly understand all aspects of the surgical procedure and instruments including their limitations. Care in appropriate selection and proper use of surgical instruments is the responsibility of the surgeon and the surgical team. Adequate surgical training should be completed before use of implants.

Factors which could impair the success of the operation:

  • Allergies to implanted materials.
  • Localized bone tumours.
  • Osteoporosis or osteomalacia.
  • System disease and metabolic disturbances.
  • Alcohol and drug abuse.
  • Physical activities involving excessive shocks, whereby the implant is exposed to blows and/or excessive loading.
  • Patients who are mentally unable to understand and comply with the doctor’s instructions.
  • Poor general health.

Possible Adverse Effects

The following adverse effects are the most common resulting from implantation:

  • Loosening of the Guide Wire, which may result from cyclic loading of the fixation site and/or tissue reaction of the implant.
  • Early and late infection.
  • Further bone fracture resulting from unusual stress or weakened bone substance.
  • Temporary or chronic neural damage resulting from pressure or hematomata.
  • Wound hematomas and delayed wound healing.
  • Vascular disease including venal thrombosis, pulmonary embolism and cardiac arrest.
  • Heterotopic ossification.
  • Pain and discomfort due to presence of the Guide Wire PFN.
  • Mechanical failure of the implant, including bending, loosening or breakage.
  • Migration of implant resulting in injury.

Preoperative Planning for Guide Wire PFN

The operating planning is carried out following a thorough clinical evaluation of the patient, Also, x-rays must be taken to allow a clear indication of the bony anatomy and associated deformities. At the time of the operation, the corresponding implantation instruments in addition to a complete size of Guide Wire PFN must be available.

The clinician should discuss with the patient the possible risks and complications associated with the use of implants. It is important to determine pre-operatively whether the patient is allergic to any of the implant materials. Also, the patient needs to be informed that the performance of the device cannot be guaranteed as complications can affect the life expectancy of the device.

Guide Wire PFN Precautions

  • Confirm functionality of instruments and check for wear during reprocessing. Replace worn or damaged instruments prior to use.
  • It is recommended to use the instruments identified for this Guide Wire PFN.
  • Handle devices with care and dispose worn bone cutting instruments in a sharps container.
  • Always irrigate and apply suction for removal of debris potentially generated during implantation or removal.

Guide Wire PFN Warnings

  • Guide Wire PFN can break during use (when subjected to excessive forces). While the surgeon must make the final decision on removal of the broken part based on associated risk in doing so, we recommend that whenever possible and practical for the individual patient, the broken part should be removed. Be aware that implants are not as strong as native bone. Implants subjected to substantial loads may fail.
  • Instruments, screws and cut plates may have sharp edges or moving joints that may pinch or tear user’s glove or skin.
  • Take care to remove all fragments that are not fixated during the surgery.
  • While the surgeon must make the final decision on implant removal, we recommend that whenever possible and practical for the individual patient, fixation devices should be removed once their service as an aid to healing is accomplished. Guide Wire removal should be followed by adequate post-operative management to avoid refracture.

Guide Wire PFN General Adverse Events

As with all major surgical procedures, risks, side effects and adverse events can occur. While many possible reactions may occur, some of the most common include: Problems resulting from anesthesia and patient positioning (e.g. nausea, vomiting, dental injuries, neurological impairments, etc.), thrombosis, embolism, infection, nerve and/or tooth root damage or injury of other critical structures including blood vessels, excessive bleeding, damage to soft tissues incl. swelling, abnormal scar formation, functional impairment of the musculoskeletal system, pain, discomfort or abnormal sensation due to the presence of the device, allergy or hypersensitivity reactions, side effects associated with hardware prominence, loosening, bending, or breakage of the device, mal-union, non-union or delayed union which may lead to breakage of the Guide Wire PFN, reoperation.