TENS Nail (Titanium Elastic Nail) Features, Benefits, Uses, Sizes and Surgical Techniques.

TENS Nail (Titanium Elastic Nail) are intended for fixation of diaphyseal fractures where the canal is narrow or flexibility of the implant is paramount.

TENS Nail also intended to treat metaphyseal and epiphyseal fractures, such as radial neck fractures, and is intended for fixation of small long bones, such as carpal and tarsal bones. In pediatric applications, the flexibility of the elastic nail allows it to be inserted at a point which avoids disruption of the bone growth plate.

Titanium Elastic Nail TENS Nail

Titanium Elastic Nail (TENS Nail) Features and Benefits:

Nail tip

  • Allows easy nail insertion and sliding along the medullary canal.
  • Height of the tip guarantees correct relation to the medullary cavity.
  • Facilitates nail manipulation for fracture reduction.

Nail diameters

  • Six nail diameters for all indications.
  • Available in titanium and stainless steel.
  • Ti alloy implants combine excellent mechanical stability with elastic properties.
  • Stainless steel implants for higher mechanical requirements.

Nail marking

  • Allows direct visual control of the alignment of the nail tip in the medullary canal reducing exposure to the image intensifier

TEN end caps

  • Two sizes of end caps to cover all nail diameters.
  • Sharp self-cutting thread for proper fixation in bone.
  • Provide additional axial stability in unstable situation.
  • Reduce the risk of soft-tissue irritation.
  • Facilitate implant removal.

Titanium Elastic Nail (TENS Nail) Uses

TENS Nail (Titanium Elastic Nail) Uses

Titanium Elastic Nail (TENS Nail) Indications in Pediatrics
Elastic stable intramedullary nailing (ESIN) with the Titanium Elastic Nail (TEN) or Stainless Steel Nail (STEN) is indicated for the management of diaphyseal and certain metaphyseal/ epiphyseal fractures of long bones in children and young adults.

As follows:

  • Diaphyseal and certain metaphyseal fractures of long bones.
  • Certain metaphyseal/-epiphyseal fractures, including but not limited to radial neck fractures.
  • Complex clavicular fractures (significant dislocation including shortening, “floating shoulder”).
  • Open fractures.
  • Threat of skin perforation at fracture ends.
  • Pathologic fractures.

Titanium Elastic Nail (TENS Nail) Indications in Adults
In adult patients, TEN is used for the osteosynthesis of clavicle, forearm and humerus fractures.

As follows:

  • Diaphyseal fractures of long bone fractures in upper extremity.
  • Clavicle shaft fractures.

Titanium Elastic Nail (TENS Nail) Sizes

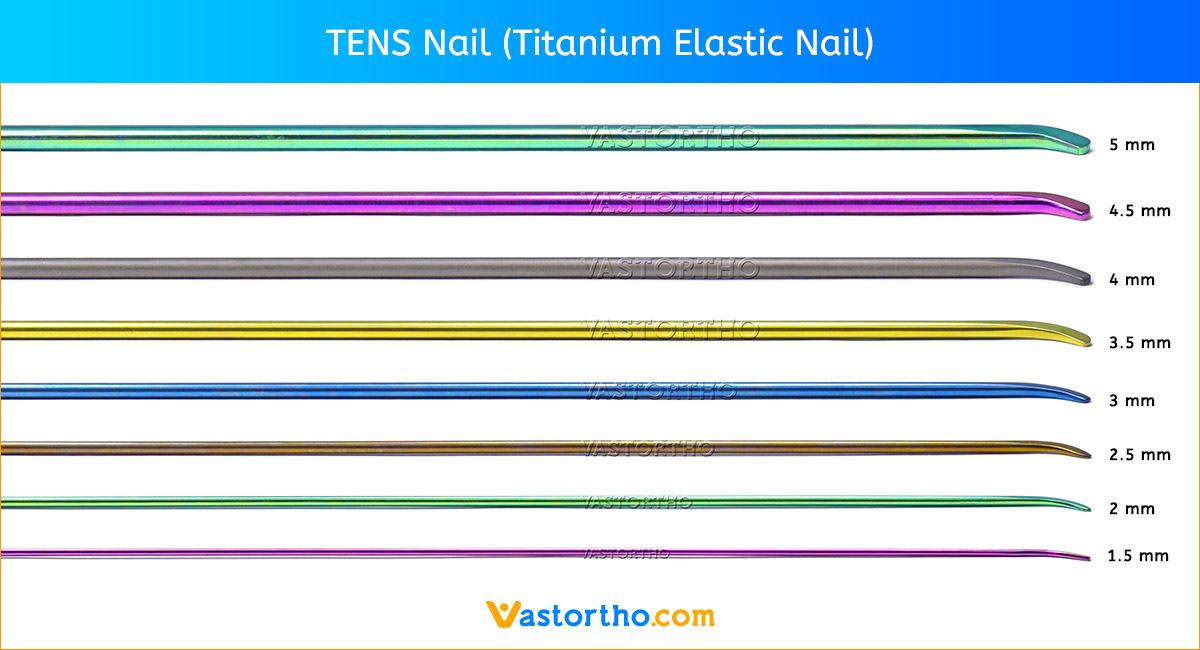
TENS Nail (Titanium Elastic Nail) are available in six diameters.

  1. 1.5 mm Dia, 440 mm Length
  2. 2 mm Dia, 440 mm Length
  3. 2.5 mm Dia, 440 mm Length
  4. 3 mm Dia, 440 mm Length
  5. 3.5 mm Dia, 440 mm Length
  6. 4 mm Dia, 440 mm Length

Measure the narrowest diameter of the medullary canal with a ruler. The proper nail diameter is no more than forty percent of the width of the canal.

The following guidelines for femoral nailing are sizes typically used for children of average stature and are dependent on patient anatomy:

  • Age 6-8, Nail Size 3 mm
  • Age 9-11, Nail Size 3.5 mm
  • Age 12-14, Nail Size 4 mm

Select two TENS Nail (Titanium Elastic Nail) of the same diameter so the opposing bending forces are equal, avoiding malalignment.

TENS Nail (Titanium Elastic Nail) Contraindications

Contraindications may be qualified or total, and need to be taken into consideration when evaluating the prognosis in each case. The physician’s education, training and professional judgement must be relied upon to choose the most appropriate device and treatment. Conditions presenting an increased risk of failure include:

  • Any active or suspected latent infection or marked local inflammation in or about the affected area.
  • Compromised vascularity that would inhibit adequate blood supply to the fracture or the operative site.
  • Bone stock compromised by disease, infection or prior implantation that can not provide adequate support and/or fixation of the devices.
  • Material sensitivity, documented or suspected.
  • Obesity. An overweight or obese patient can produce loads on the implant that can lead to failure of the fixation of the device or to
    failure of the device itself.
  • Patients having inadequate tissue coverage over the operative site.
  • Implant utilization that would interfere with anatomical structures or physiological performance.
  • Any mental or neuromuscular disorder which would create an unacceptable risk of fixation failure or complications in postoperative care.
  • Other medical or surgical conditions which would preclude the potential benefit of surgery.
  • All associated diseases which could endanger the function and success of the TENS Nail (Titanium Elastic Nail).

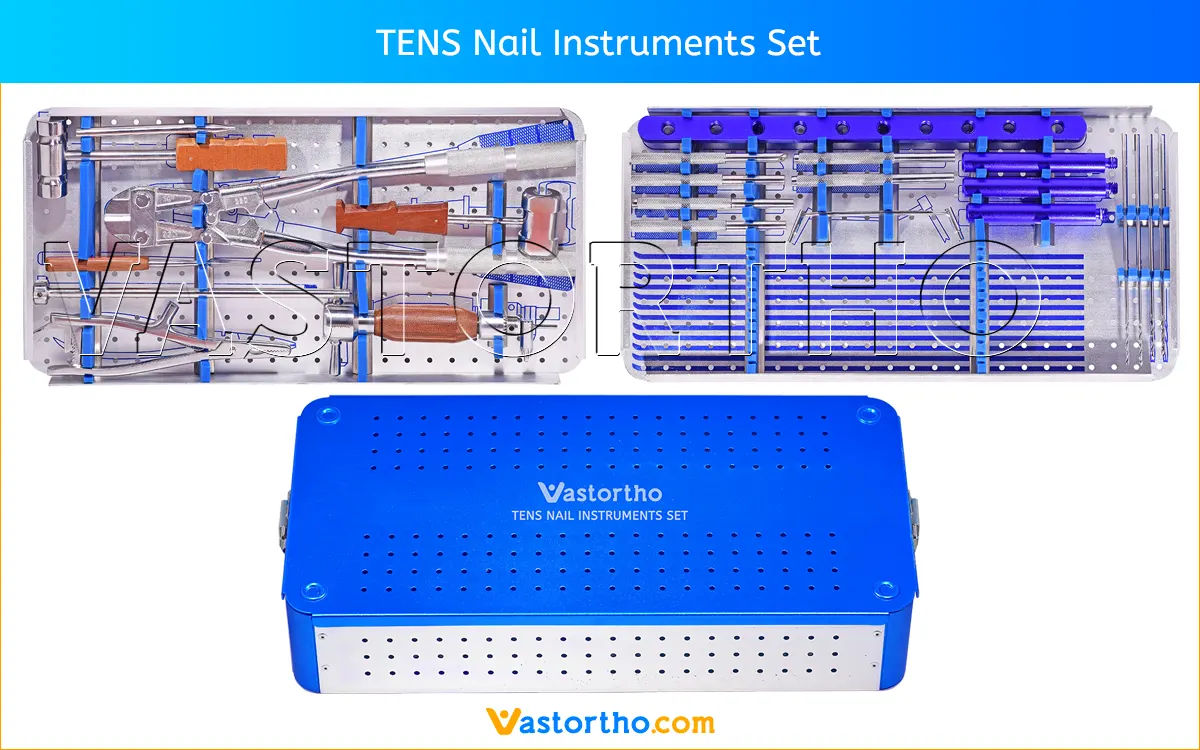
TENS Nail (Titanium Elastic Nail) Instruments Set

TENS Nail Instruments Set

TENS Nail Instruments Set contains instruments required for  for the management of diaphyseal and certain metaphyseal/ epiphyseal fractures of long bones in children and young adults.

TENS Nail Instruments Set Features:

  1. Instruments for Tens Nail from dia 1.5 mm to 5 mm.
  2. Instruments are organised in general order of use.
  3. TENS Nail Instruments Set can be modified according to customer requirements and preference also, in this case minimum quantities are required.
  4. Instruments are fitted in Silicon Foam.
  5. Graphics of instruments are made in instruments Box to keep Instruments at their define places.

Below are list of items in TENS Nail Instruments Set.

  • F Tool Bar Small for Reduction: 1 pcs
  • Threaded Rod for F Tool Bar: 1 pcs
  • Threaded Rod for F Tool Bar: 1 pcs
  • Threaded Rod for F Tool Bar: 1 pcs
  • Elastic Nail Impactor Oblique 4.5 mm: 1 pcs
  • Elastic Nail Impactor 2.0 mm: 1 pcs
  • Elastic Nail Impactor 2.5 mm: 1 pcs
  • Elastic Nail Impactor 3.0 mm: 1 pcs
  • Elastic Nail Impactor 3.5 mm: 1 pcs
  • Elastic Nail Impactor 4.0 mm: 1 pcs
  • Double Drill Guide 3.2/4.5 mm: 1 pcs
  • Drill Bit 3.2 x 200 mm: 2 pcs
  • Drill Bit 3.5 x 200 mm: 2 pcs
  • Extraction Plier for TENS Nail: 1 pcs
  • Extractor Rod: 1 pcs
  • Bone Awl: 1 pcs
  • Hammer Fibre Handle 500 grams: 1 pcs
  • Pin Wrench 4.5 x 120 mm: 1 pcs
  • Slide Hammer: 1 pcs
  • Nail Cutter 14 inches: 1 pcs
  • TENS Nail Inserter, T Handle with Chuck and Key: 1 pcs
  • Graphics Aluminium Box with Silicone Fittings: 1 pcs

Do you have any questions for Titanium Elastic Nail (TENS Nail)? Please fill this form we will get in touch with you shortly.

Name(Required)
This field is for validation purposes and should be left unchanged.

More Products from Interlocking Nails

TENS Nail (Titanium Elastic Nail) Surgical Technique for Pediatric Femur

Femoral fractures in children are typically stabilized with two TENS Nail (Titanium Elastic Nail) inserted in a retrograde manner from medial and lateral entry points above the distal physis. Antegrade nailing, with a lateral entry point, is normally reserved for very distal femoral fractures.

Positioning the patient

Position the patient supine in a free position or on a fracture table with a traction boot. If fracture reduction can be accomplished
with manual reduction (usually only in small patients), a standard table may be used. Position the image intensifier on the lateral side of the affected femur for AP and lateral views of the leg from knee to hip. The setup must allow the surgeon access to both the lateral and medial aspects of the distal femur. Reduce the fracture and confirm alignment with fluoroscopy in both the AP and lateral views. Prep and drape the leg from hip to knee for reduction and intraoperative imaging.

Contouring the TENS Nail (Titanium Elastic Nail)

Contour both TENS Nail (Titanium Elastic Nail) into a bow shape with the nail tip pointing to the concave side of the bowed nail. The etched line on the nail will provide a reference for the nail tip during insertion and should follow the same plane as the bow. Contouring may be done by hand or with the tabletop Plate-Bending Press. The apex of the bow should be at the level of the fracture. This shape allows the nail to generate optimal resistance to malaligning forces. The bow in each nail should be similar for a balanced effect.

Creating the TENS Nail (Titanium Elastic Nail) entry point

Penetrate the near cortex with the drill bit. With the drill bit rotating, but not advancing, slowly lower the drill to a 45° angle relative to the shaft axis. Now advance the drill bit at this angle until it reaches the medullary canal.

Alternatively, the Awl can be used to penetrate the near cortex. Vertically insert the Awl down to the bone. With rotating motion, lower the Awl to a 45° angle relative to the shaft axis and continue to penetrate the cortical bone at an upward angle.

Inserting the TENS Nail (Titanium Elastic Nail)

Locate and maintain the entry hole with a fingertip while withdrawing the drill bit and introducing the nail. Using fluoroscopy, align the TENS Nail (Titanium Elastic Nail) tip so the convex side will glance off the far cortex. Advance the nail through the drilled entry hole by hand as far as possible.

Attach the Inserter with Universal Chuck onto the nail with a length of about 150 mm of nail between the inserter and entry point. The
longer this distance, the more difficult hammering will be since the nail will dampen the impact force. Tighten the inserter using the Spanner
Wrench.

Attach the Slide Hammer to the shaft of the inserter. Use controlled blows to drive the nail up the medullary canal.

Alternatively, the Hammer Guide and Inserter can be used for nail insertion. The alternative instruments are used in the same manner described for the Inserter with Universal Chuck.

Monitor nail advancement with fluoroscopy. Ensure that the convex side of the nail tip is glancing off the far cortex and is advancing with each blow. The nail will bend as it progresses up the canal. This part of the procedure requires the greatest insertion force.

Reducing the Fracture
Use the Small F-Tool to provide reduction forces on either side of the fracture gap To assemble the tool:
1. Thread one Threaded Rod at the end of the Bar.
2. Thread the second rod into the bar so the rods just fit across the leg.
3. Thread the third rod into the opposite end of the bar.

The Small F-Tool is placed on the leg at the level of the fracture so that both rods provide force on the opposing fragments to aid reduction.

Drive the first TENS Nail (Titanium Elastic Nail) to the level of the fracture. In a similar manner to that previously described, open the femur on the opposite side and insert the second TENS Nail (Titanium Elastic Nail) up to the level of the fracture.

Crossing the fracture
Visualize the fracture with fluoroscopy. Determine which TENS Nail will be easier to pass across the fracture. Advance that nail which will most effectively pull the proximal fragment into alignment. Using the Inserter with Universal Chuck and Detachable Slide Hammer, drive the nail
across the fracture, monitoring nail position with fluoroscopy. Alternatively, the Hammer Guide and Inserter may be used with the Detachable Slide Hammer to drive the nail.

The Titanium Elastic Nail can be rotated to manipulate the curved tip across the fracture. Rotation is easiest while the nail is being advanced or retracted.

Care should be taken not to twist the nails more than 90°. Otherwise, a “corkscrew phenomenon” may be created and stability will be lost. Rotating the nail while it is stationary may loosen the Inserter.

Advance the nail into the proximal fragment only enough to ensure reduction will be maintained. Further advancement may cause displacement of
the proximal fragment making it more difficult to pass the second nail. Confirm nail position in both the AP and lateral views.

Using the Inserter and Slide Hammer, drive the second nail across the fracture and into the proximal fragment. Continue advancing this nail until it is just distal to the proximal physis. Advance the other nail to the same level. The two nails should diverge in opposite directions, both medial and lateral, for optimal rotational stability. If the fracture is distracted, release traction and impact the
patient’s heel.

Cutting the TENS Nail (Titanium Elastic Nail) to length
Prior to cutting the TENS Nail to length, verify the position of the nails in relation to the rotation of the leg. Once the nail is inserted to its final position, mark the nail with a pen or clamp at the planned cutoff point. (The cutoff point should be 10 –20 mm outside of the cortex.)
Retract the nail far enough to access the cutoff point from outside the incision (usually 25–50 mm).

Bend the Titanium Elastic Nail end away from the bone to deform it slightly (approximately 10–15° of permanent deflection). This will allow the protruding nail end to sit slightly off the cortex for easy removal while remaining low-profile to minimize soft tissue irritation.

Cut the nail with the Rod Cutter to the appropriate length. Reinsert the nail with either the Standard Tamp or Beveled Tamp and Hammer. The Standard Tamp captures 2 mm of nail tip.

The Beveled Tamp captures 6 mm of nail tip and will leave approximately 10 mm of nail protruding from the cortex when the tamp is driven flush to the periosteum. Keep the etched line aligned with the long axis of the bone to keep the beveled surface in proper orientation. In order to prevent distraction of the fracture, a slight blow on the knee is recommended.

Confirm final nail position and fracture reduction with fluoroscopy. In its final position, the end of the nail should protrude 10–20 mm
outside the cortex at an angle approximately 10–15° above the bone. If the nail has been overinserted, use the Locking Pliers to grip and retract the nail.
TENS Nail (Titanium Elastic Nail) Removal

Palpate over the TENS Nail end, make an incision in the skin and bluntly dissect to expose the nail. Fluoroscopy may be needed to find the nail
end. Once the nail end is exposed, attach the Locking Pliers. The pliers require only a few millimeters of engagement with the nail for removal in most cases.

If capturing the Titanium Elastic Nail is difficult, the lower jaw of the Locking Pliers can be driven under the nail end with light mallet blows. Use care to protect the physis from damage.

To remove the nail, use the Hammer to strike the Locking Pliers on its “horn.” Once the nail is retracted a few millimeters, removal can usually be completed by hand. If the nail is still difficult to remove, the Inserter and Slide Hammer can be used to complete removal.

Warnings and Precautionary for TENS Nail (Titanium Elastic Nail)

Before using TENS Nail (Titanium Elastic Nail), the surgeon and ancillary staff should study the safety information in these instructions, as well as any product-specific information in the product description, surgical procedures and/or brochures.

TENS Nail is made from medical grade materials and are designed, constructed and produced with utmost care. These quality TENS Nails assure best working results provided they are used in the proper manner. Therefore, the following instructions for use and safety recommendations must be observed.

Improper use of  Nails can lead to damage to the tissue, premature wear, destruction of the instruments and injury to the operator, patients or other persons.

It is vital for the operating surgeon to take an active role in the medical management of their patients. The surgeon should thoroughly understand all aspects of the surgical procedure and instruments including their limitations. Care in appropriate selection and proper use of surgical instruments is the responsibility of the surgeon and the surgical team. Adequate surgical training should be completed before use of implants.

Factors which could impair the success of the operation:

  • Allergies to implanted materials.
  • Localized bone tumours.
  • Osteoporosis or osteomalacia.
  • System disease and metabolic disturbances.
  • Alcohol and drug abuse.
  • Physical activities involving excessive shocks, whereby the implant is exposed to blows and/or excessive loading.
  • Patients who are mentally unable to understand and comply with the doctor’s instructions.
  • Poor general health.

Possible Adverse Effects

The following adverse effects are the most common resulting from implantation:

  • Loosening of the TENS Nail, which may result from cyclic loading of the fixation site and/or tissue reaction of the implant.
  • Early and late infection.
  • Further bone fracture resulting from unusual stress or weakened bone substance.
  • Temporary or chronic neural damage resulting from pressure or hematomata.
  • Wound hematomas and delayed wound healing.
  • Vascular disease including venal thrombosis, pulmonary embolism and cardiac arrest.
  • Heterotopic ossification.
  • Pain and discomfort due to presence of the TENS Nail (Titanium Elastic Nail).
  • Mechanical failure of the implant, including bending, loosening or breakage.
  • Migration of implant resulting in injury.

Preoperative Planning for TENS Nail (Titanium Elastic Nail)

The operating planning is carried out following a thorough clinical evaluation of the patient, Also, x-rays must be taken to allow a clear indication of the bony anatomy and associated deformities. At the time of the operation, the corresponding implantation instruments in addition to a complete size of TENS Nail (Titanium Elastic Nail) must be available.

The clinician should discuss with the patient the possible risks and complications associated with the use of implants. It is important to determine pre-operatively whether the patient is allergic to any of the implant materials. Also, the patient needs to be informed that the performance of the device cannot be guaranteed as complications can affect the life expectancy of the device.

TENS Nail (Titanium Elastic Nail) Precautions

  • Confirm functionality of instruments and check for wear during reprocessing. Replace worn or damaged instruments prior to use.
  • It is recommended to use the instruments identified for this Nails.
  • Handle devices with care and dispose worn bone cutting instruments in a sharps container.
  • Always irrigate and apply suction for removal of debris potentially generated during implantation or removal.

TENS Nail (Titanium Elastic Nail) Warnings

  • TENS Nail (Titanium Elastic Nail) can break during use (when subjected to excessive forces). While the surgeon must make the final decision on removal of the broken part based on associated risk in doing so, we recommend that whenever possible and practical for the individual patient, the broken part should be removed. Be aware that implants are not as strong as native bone. Implants subjected to substantial loads may fail.
  • Instruments, screws and cut plates may have sharp edges or moving joints that may pinch or tear user’s glove or skin.
  • Take care to remove all fragments that are not fixated during the surgery.
  • While the surgeon must make the final decision on implant removal, we recommend that whenever possible and practical for the individual patient, fixation devices should be removed once their service as an aid to healing is accomplished. Nails removal should be followed by adequate post-operative management to avoid refracture.

TENS Nail (Titanium Elastic Nail) General Adverse Events

As with all major surgical procedures, risks, side effects and adverse events can occur. While many possible reactions may occur, some of the most common include: Problems resulting from anesthesia and patient positioning (e.g. nausea, vomiting, dental injuries, neurological impairments, etc.), thrombosis, embolism, infection, nerve and/or tooth root damage or injury of other critical structures including blood vessels, excessive bleeding, damage to soft tissues incl. swelling, abnormal scar formation, functional impairment of the musculoskeletal system, pain, discomfort or abnormal sensation due to the presence of the device, allergy or hypersensitivity reactions, side effects associated with hardware prominence, loosening, bending, or breakage of the device, mal-union, non-union or delayed union which may lead to breakage of the TENS Nail (Titanium Elastic Nail), reoperation.