Thompson Hip Prosthesis Specification, Indication, Uses, Images and Sizes.

Thompson Hip Prosthesis

Thompson Hip Prosthesis Specification

  • Thompson Hip Prosthesis is design for patient with limited femoral neck above the lesser trochanter.
  • Designed for use as a salvage prosthesis for femoral neck fractures, nonunions, in femoral neck fractures with a shortened femoral neck (due to bony resorption).
  • More vertical angle of the collar on the Thompson prosthesis tends to allow sinking of the prosthesis into the medullary cavity.
  • Thompson prosthesis has a more vertical neck angle and is better indicated for the patient with a low or distal neck fracture.
  • Thompson Prosthesis is cemented
  • Thompson Prosthesis available in different head sizes to fit accurately in the acetabulum. Available Head Dia sizes are 37mm, 38mm, 39mm, 40mm, 41mm, 42mm, 43mm, 44mm, 45mm, 46mm, 47mm, 48mm, 49mm, 50mm, 51mm, 52mm, 53mm, 54mm and 55mm. Any other Sizes will be also made on demand
  • Available in both Sterile and Non-Sterile packing.
  • Made up from high quality Medical grade stainless steel.
  • Available in 3 types of Stem: Standard Stem, Narrow Stem and Extra Long Stem to choose according for best fit.

Thompson Hip Prosthesis Indication

Thompson Hip Prosthesis is commonly used for the treatment of fractures of the femoral neck elderly patients.

Do you have any questions for Thompson Hip Prosthesis? Please fill this form we will get in touch with you shortly.

Name(Required)
This field is for validation purposes and should be left unchanged.

Thompson Hip Prosthesis Instruments Set Features

Thompson Hip Prosthesis Instruments Set

Thompson Hip Prosthesis Instruments Set contains instruments required for Standard Stem, Narrow Stem and Broad Stem Hip Prosthesis.

Features:

  1. Instruments for Standard Stem, Narrow Stem and Broad Stem Hip Prosthesis.
  2. Instruments are organised in general order of use.
  3. Instruments are fitted in Silicon Foam.
  4. Graphics of instruments are made in instruments Box to keep Instruments at their define places.

Thompson Hip Prosthesis Instruments Set Items

Below are list of items in Thompson Hip Prosthesis Instruments Set. Instruments can be modified according to the customer’s requirement. All these instruments can be used several times. These instruments are Non Sterile.

Our Orthopedic Instruments Set comprises many of items which are manufacture by superior grade of stainless steel, Aluminum and Carbon Fiber etc. These are the tools specifically designed to carry out different actions and to achieve various purposes during a surgery or an operation we are paying our best efforts which meets the same quality standards of all orthopedic instruments as needed.

We are keeping wide range of instruments items in instruments set to ensures that Doctors get almost all required items during surgery for Thompson Hip Prosthesis Instruments Set.

List of items in Thompson Hip Prosthesis Instruments Set Items:

  • Rasp with Tomy Bar
  • Bone File Large
  • Bone Hammer 500gm
  • Extractor with 2Hook
  • Head Measuring Gauge 37mm to 55mm
  • Impactor For Solid Aluminum Handle
  • Judet Extractor
  • Moore Hollow Chisel
  • Murphy Bone Skid
  • Nylon Face Impactor
  • Spare Hook
  • Thompson Rasp with Tomy Bar
  • Graphics Aluminum Box with Silicone Fittings

Thompson Hip Prosthesis Surgical Technique

STEP 1
Confirm that a hemi-arthroplasty is indicated.

STEP 2
The patient is positioned and prepared on the operating table in the usual manner. Expose the hip joint using your preferred surgical approach for hemi-arthroplasty.

STEP 3
Following exposure of the hip, cut the femoral neck. In most individuals an appropriate level of neck resection lies along a line drawn from a point medially mid-way between the upper margin of the lesser trochanter and inferior aspect of the head, to a point laterally at the base of the neck.

If the neck is cut too long, the leg will be lengthened, and the hip will be tight and difficult to reduce. The converse will be the case if the cut is too low, and the hip may be unstable. The neck cut may need to be modified a little higher or lower in valgus or varus hips,
respectively.

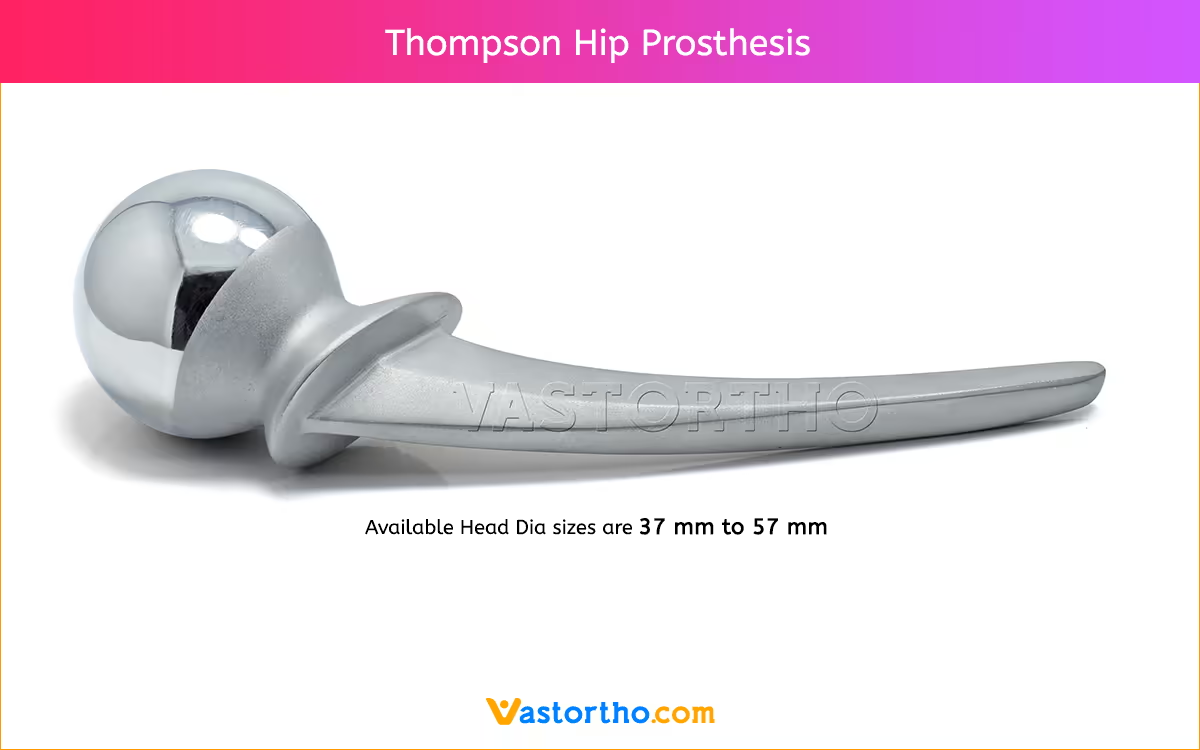
Remove and measure the femoral head or alternatively use an appropriate instrument to measure the size of the acetabulum. Select an implant with a femoral head of the same size.

STEP 4
Ensuring the gluteus maximus tendon is retracted and protected, a box chisel is used to open the proximal femur. This should be positioned laterally and posteriorly to gain exposure in line with the femoral canal.

STEP 5
Proximal femur preparation is made with the femoral rasp. This should be done by hand unless the bone is unusually hard, as using a hammer
risks fracturing a fragile osteopenic femur.

The rasp should be inserted with the required amount of anteversion: typically this is between 0° and 20° depending on the preferred approach. The rasp should be inserted to a depth where the top cutting teeth line up with the neck resection line.

STEP 6
Following rasping, insert the definitive stem to ensure correct fit, seating and alignment can be achieved. Trim the neck if required to allow the collar of the prosthesis to sit flush. Confirm version is correct (see step 5). A trial reduction can be performed if required.

NB If performing a trial reduction, take great care when re-dislocating the hip. A swab around the neck of the prosthesis or a bone hook should be used to help dislocate and deliver the femoral head out of the acetabulum. Undue torsional force applied through the leg can fracture an osteoporotic femur.

STEP 7

Proceed with the preferred method of cementing technique. (Modern cementing techniques are recommended, including the use of a distal cement plug, thorough lavage and drying of the canal and retrograde filling with a cement gun).

The stem is inserted by hand until the collar of the prosthesis reaches the neck resection line on the medial calcar. The surgeon must hold the stem in position with the Femoral Head Driver until the bone cement is fully polymerised.

STEP 8

Remove any excess cement from around the neck of the prosthesis and take care to ensure that the acetabulum is clear of any cement, bone fragments of soft tissue before reducing the hip. Confirm stability and a concentric reduction before layered wound closure.

The general post-operative management of the patient should follow the normal protocols of the operating surgeon and the institution in which the surgery was performed

More Products from Hip Prosthesis