2.7 mm Locking Dorsal Distal Radius Plate Specification, Uses, Sizes & Surgical Instruments.

2.7 mm Locking Dorsal Distal Radius Plate

2.7 mm Locking Dorsal Distal Radius Plate Specification

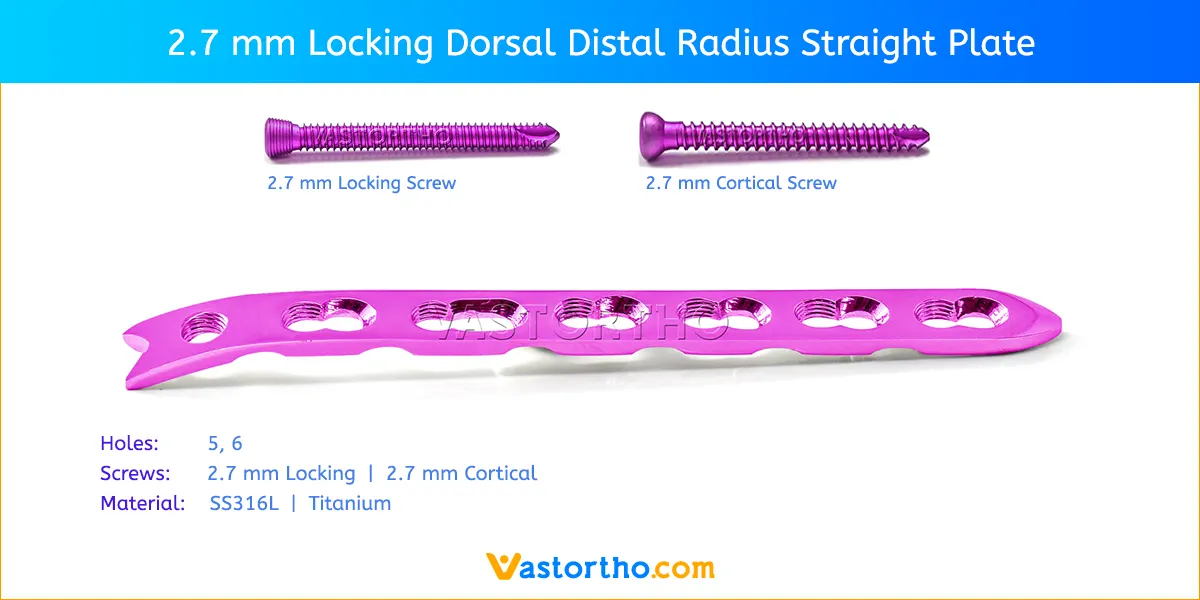
  • Plates available holes are 5 and 6.
  • Available in both Titanium and Stainless steel.
  • Plate has combi holes and round holes. Combi holes allow fixation with locking screws in the threaded section and cortex screws in the dynamic compression unit section for compression.
  • The shaft holes accept 2.7 mm locking screws in the threaded portion or 2.7 mm cortical screws  in the compression portion.
  • Locking screws offer a fixed-angle construct to support the articular surface, reduce the need for bone graft, and obtain fixation in osteoporotic bone.
  • 2.7 mm Locking Dorsal Distal Radius Plate allow implant placement to address the individual fracture pattern.
  • Limited-contact surface reduces bone-to-plate contact and helps to preserve the periosteal blood supply.
  • 2.7 mm Locking Dorsal Distal Radius Plate two-plate technique offers a strong construct for complex distal radius fractures and avoids removal of Lister’s tubercle.
  • Choice of different lengths of plate eliminates the need to cut plates.
  • Plates are contoured to fit the radial column and have a notched tip that allows them to fit on the radial styloid, adjacent to a temporary K-wire fixation.
  • Low plate-and-screw profile minimizes potential for tendon and soft tissue irritation.
  • Rounded edges minimize potential for tendon adhesion.
  • Smaller plates and screws address fracture fragments individually, with less overall implant bulk.
  • locking plate increases construct stability, decreases risk of screw back-out and subsequent loss of reduction. It also reduces the need for precise anatomic plate contouring and minimizes the risk of stripped screw holes.
  • A complete Instruments Set is available for 2.7 mm Locking Dorsal Distal Radius Plate. General Instruments are available for this plate such as Plate Bending Press, Plate Holding Forceps, Plate Bending Pliers, Bone Holding Forceps, Bone Elevators, Bone Cutter, Bone Nibbler, Depth Gauge, Sleeve, Screw Driver, Trocar Sleeve etc.

2.7 mm Locking Dorsal Distal Radius Plate Uses

2.7 mm Locking Dorsal Distal Radius Plate is used or fixation of complex intra and extra-articular fractures and osteotomies of the distal radius and other small bones.

Instruments for 2.7 mm Locking Dorsal Distal Radius Plate

Distal Radius Plates Instruments Set

A complete instruments set are also available for 2.7 mm Locking Dorsal Distal Radius Plate. Instruments can be modified according to the customer’s requirement with minimum quantity required. All these instruments can be used several times.

We are keeping wide range of  instruments items in this set to ensures that Doctors get almost all required items during. Below is list of items of this set.

  • 2.4 mm Threaded Drill Guide for 1.8 mm Drill Bit
  • 2.7 mm Threaded Drill Guide for 2 mm Drill Bit
  • Counter Sink Copuling Shaft
  • Depth Gauge for 2 / 2.4 mm Screws
  • Depth Gauge for 2.7 mm Screws
  • Double Drill Sleeve (Universal Drill Sleeve) 1.8/2.4 mm
  • Double Drill Sleeve (Universal Drill Sleeve) 2.0/2.7 mm
  • Drill Bit 1.8 x 100 mm, Quick Coupling
  • Drill Bit 2 x 100 mm, Quick Coupling
  • Drill Bit 2.4 x 100 mm, Quick Coupling
  • Drill Bit 2.7 x 100 mm, Quick Coupling
  • Hohmann Recator 6 mm
  • Kirschner Wire 1.8 x 150 mm
  • Plate Bender
  • Periosteal Elevator Fiber Handle
  • Plate and Bone Holding Forceps Ratchet Lock-Type1
  • Plate and Bone Holding Forceps Ratchet Lock-Type2
  • Reduction Forcep Pointed Tip Ratchet Lock
  • Reduction Forcep Serrated Tip Ratchet Lock
  • Screw Driver Hexagonal, Holding Sleeve, for 2.7 mm Locking Screws
  • Screw Driver Torque for 2.4/2.7 mm Locking Screws
  • Screw Driver Quick Coupling for 2.7 mm Locking Screws
  • Sharp Hook
  • T Handle Quick Coupling
  • Tap for 2.4 mm Screws, Quick Coupling
  • Tap for 2.7 mm Screws, Quick Coupling
  • Graphics Aluminum Box with Silicone Fittings

Do you have any questions for 2.7 mm Locking Dorsal Distal Radius Plate?
Please fill this form we will get in touch with you shortly.

Name(Required)
This field is for validation purposes and should be left unchanged.

Advantages of using locking plate for 2.7 mm Locking Dorsal Distal Radius Plate

  • 2.7 mm Locking Dorsal Distal Radius Plate is a locking plate so it does not have to precisely contact the underlying bone in all areas. When screws are tightened, they “lock” to the threaded screw holes of the plate, stabilizing the segments without pulling the bone to the plate. Locking screws make it impossible for screw insertion to alter the reduction. Nonlocking plate/screw systems require a precise adaptation of the plate to the underlying bone. Without this close contact, tightening of the screws will pull the bone segments toward the plate, resulting in loss of reduction and possibly the occlusal relationship
  • Locking plate/screw systems do not disrupt the underlying cortical bone perfusion as much as conventional plates, which compress the plate to the cortical bone.
  • Screws are unlikely to loosen from the plate. Similarly, if a bone graft is screwed to the plate, a locking head screw will not loosen during the phase of graft incorporation and healing. The possible advantage to this property of a locking plate/screw system is decreased risk of inflammatory complications due to hardware loosening.
  • Locking plate/screw systems have been shown to provide more stable fixation than conventional nonlocking plate/screw systems.

Locking Screw Technology

The heads of the locking screws contain male threads while the holes in the plates contain female threads. This allows the screw head to be threaded into the 2.7 mm Locking Dorsal Distal Radius Plate hole, locking the screw into the plate. This technical innovation provides the ability to create a fixedangle construct while using familiar plating techniques.

Locking Plate Technology

By using locking screws in a bone plate, a fixed-angle construct is created. In osteopenic bone or fractures with multiple fragments, secure bone purchase with conventional screws may be compromised. Locking screws do not rely on bone/plate compression to resist patient load, but function similarly to multiple small angled blade plates. In osteopenic bone or comminuted fractures, the ability to lock screws into a fixed-angle construct is imperative.

By combining locking screw holes with compression screw slots in the shaft, the plate can be used as both a locking device and a fracture compression device. If compression is desired, it must be achieved first by inserting the standard screws in the compression screw slots before inserting any locking screws.

More Products from Locking Distal Radius Plates

Screws available for 2.7 mm Locking Dorsal Distal Radius Plate

2.7 mm Locking Cortical Screws

2.7 mm Locking Cortical Screws available lengths are 8mm, 10mm, 12mm, 14mm, 16mm, 18mm, 20mm, 22mm, 24mm, 26mm, 28mm, 30mm, 32mm, 34mm, 36mm, 38mm and 40mm.

2.7 mm Cortical Screws

2.7 mm Cortical Screws available lengths are 8mm, 10mm, 12mm, 14mm, 16mm, 18mm, 20mm, 22mm, 24mm, 26mm, 28mm, 30mm, 32mm, 34mm, 36mm, 38mm and 40mm.

These Screws are made from pure Titanium and SS 316L. Any additional length sizes of these screws will be made on demand.

2.7 mm Locking Dorsal Distal Radius Plate Contraindications

Contraindications may be qualified or total, and need to be taken into consideration when evaluating the prognosis in each case. The physician’s education, training and professional judgement must be relied upon to choose the most appropriate device and treatment. Conditions presenting an increased risk of failure include:

  • Any active or suspected latent infection or marked local inflammation in or about the affected area.
  • Compromised vascularity that would inhibit adequate blood supply to the fracture or the operative site.
  • Bone stock compromised by disease, infection or prior implantation that can not provide adequate support and/or fixation of the devices.
  • Material sensitivity, documented or suspected.
  • Obesity. An overweight or obese patient can produce loads on the implant that can lead to failure of the fixation of the device or to
    failure of the device itself.
  • Patients having inadequate tissue coverage over the operative site.
  • Implant utilization that would interfere with anatomical structures or physiological performance.
  • Any mental or neuromuscular disorder which would create an unacceptable risk of fixation failure or complications in postoperative care.
  • Other medical or surgical conditions which would preclude the potential benefit of surgery.
  • All associated diseases which could endanger the function and success of the 2.7 mm Locking Dorsal Distal Radius Plate.

Warnings and Precautionary for 2.7 mm Locking Dorsal Distal Radius Plate

Before using 2.7 mm Locking Dorsal Distal Radius Plate, the surgeon and ancillary staff should study the safety information in these instructions, as well as any product-specific information in the product description, surgical procedures and/or brochures.

Plates are made from medical grade materials and are designed, constructed and produced with utmost care. These quality assure best working results provided they are used in the proper manner. Therefore, the following instructions for use and safety recommendations must be observed.

Improper use of Plates can lead to damage to the tissue, premature wear, destruction of the instruments and injury to the operator, patients or other persons.

It is vital for the operating surgeon to take an active role in the medical management of their patients. The surgeon should thoroughly understand all aspects of the surgical procedure and instruments including their limitations. Care in appropriate selection and proper use of surgical instruments is the responsibility of the surgeon and the surgical team. Adequate surgical training should be completed before use of this plate.

Factors which could impair the success of the operation:

  • Allergies to implanted materials.
  • Localized bone tumours.
  • Osteoporosis or osteomalacia.
  • System disease and metabolic disturbances.
  • Alcohol and drug abuse.
  • Physical activities involving excessive shocks, whereby the implant is exposed to blows and/or excessive loading.
  • Patients who are mentally unable to understand and comply with the doctor’s instructions.
  • Poor general health.

Possible Adverse Effects

The following adverse effects are the most common resulting from implantation:

  • Loosening of the 2.7 mm Locking Dorsal Distal Radius Plate, which may result from cyclic loading of the fixation site and/or tissue reaction of the implant.
  • Early and late infection.
  • Further bone fracture resulting from unusual stress or weakened bone substance.
  • Temporary or chronic neural damage resulting from pressure or hematomata.
  • Wound hematomas and delayed wound healing.
  • Vascular disease including venal thrombosis, pulmonary embolism and cardiac arrest.
  • Heterotopic ossification.
  • Pain and discomfort due to presence of the Implants.
  • Mechanical failure of the implant, including bending, loosening or breakage.
  • Migration of implant resulting in injury.

Preoperative Planning for 2.7 mm Locking Dorsal Distal Radius Plate

The operating planning is carried out following a thorough clinical evaluation of the patient, Also, x-rays must be taken to allow a clear indication of the bony anatomy and associated deformities. At the time of the operation, the corresponding implantation instruments in addition to a complete set of 2.7 mm Locking Dorsal Distal Radius Plate must be available.

The clinician should discuss with the patient the possible risks and complications associated with the use of Implants. It is important to determine pre-operatively whether the patient is allergic to any of the implant materials. Also, the patient needs to be informed that the performance of the device cannot be guaranteed as complications can affect the life expectancy of the device.

2.7 mm Locking Dorsal Distal Radius Plate Precautions

  • Confirm functionality of instruments and check for wear during reprocessing. Replace worn or damaged instruments prior to use.
  • It is recommended to use the instruments identified for this screw.
  • Handle devices with care and dispose worn bone cutting instruments in a sharps container.
  • Always irrigate and apply suction for removal of debris potentially generated during implantation or removal.

2.7 mm Locking Dorsal Distal Radius Plate Warnings

  • 2.7 mm Locking Dorsal Distal Radius Plate can break during use (when subjected to excessive forces). While the surgeon must make the final decision on removal of the broken part based on associated risk in doing so, we recommend that whenever possible and practical for the individual patient, the broken part should be removed. Be aware that implants are not as strong as native bone. Implants subjected to substantial loads may fail.
  • Instruments, screws and cut plates may have sharp edges or moving joints that may pinch or tear user’s glove or skin.
  • Take care to remove all fragments that are not fixated during the surgery.
  • While the surgeon must make the final decision on implant removal, we recommend that whenever possible and practical for the individual patient, fixation devices should be removed once their service as an aid to healing is accomplished. Implant removal should be followed by adequate post-operative management to avoid refracture.

2.7 mm Locking Dorsal Distal Radius Plate General Adverse Events

As with all major surgical procedures, risks, side effects and adverse events can occur. While many possible reactions may occur, some of the most common include: Problems resulting from anesthesia and patient positioning (e.g. nausea, vomiting, dental injuries, neurological impairments, etc.), thrombosis, embolism, infection, nerve and/or tooth root damage or injury of other critical structures including blood vessels, excessive bleeding, damage to soft tissues incl. swelling, abnormal scar formation, functional impairment of the musculoskeletal system, pain, discomfort or abnormal sensation due to the presence of the device, allergy or hypersensitivity reactions, side effects associated with hardware prominence, loosening, bending, or breakage of the device, mal-union, non-union or delayed union which may lead to breakage of the implant, reoperation.

2.7 mm Locking Dorsal Distal Radius Plate Surgical Technique

Volar Plating Surgical Technique

1. Position patient

Place the patient in the supine position with the hand and arm on a hand table, preferably radiolucent for fluoroscopic imaging. The elbow should be fully extended and in full supination.

2. Approach

Make a longitudinal incision slightly radial to the flexor carpi radialis tendon (FCR). Dissect between the FCR and the radial artery, exposing the pronator quadratus. Detach the pronator
quadratus from the lateral border of the radius and elevate it toward the ulna so the radius is exposed and the fracture is visualized.

3. Reduce fracture and position plate

Reduce the fracture using the preferred reduction technique. The reduction method will be fracture specific.

Apply the plate to fit the volar surface of the distal radius and insert a 2.7 mm screw into the long hole in the shaft, following the method described in the General Technique section. Adjust the plate position as necessary, and tighten the screw.

4. Insert distal screws

The order of screw insertion in the shaft and metaphysis may vary depending on fracture pattern and reduction technique.

Select the preferred drill guide and insert it into a 2.7 mm locking hole in the head of the plate. Drill to the desired depth with a 2.0 mm drill bit or 2.0 mm K-wire. Measure correct screw length using the preferred method as described in the General Technique section. Insert a 2.7 mm locking screw or 2.0 mm LCP Buttress Pin.

Verify plate and distal screw location with a drill bit or K-wires before inserting multiple screws.

5. Insert remaining proximal screws

Determine where 2.7 mm locking or 2.7 mm cortex screws will be used in the shaft of the volar plate. Following the steps described in the General Technique section, insert these screws, beginning with the most proximal screw.

6. Confirm proper joint reconstruction

Confirm proper joint reconstruction, screw placement, and screw length, using multiple C-arm views. To ensure that the most distal screws are not in the joint, use additional views.

7. Close incision

Use the appropriate method for surgical closure of the incision.

Dorsal Plating Surgical Technique

1. Position patient

Place the patient in the supine position with the hand and arm on a hand table, preferably radiolucent for fluoroscopic imaging. The elbow should be fully extended with the hand pronated.

2. Approach

Make a straight incision 5 cm to 9 cm in length, approximately 2 cm proximally from the base of the second metacarpal over Lister’s tubercle to the border of the muscle belly of the first extensor compartment.

Open the extensor retinaculum using a longitudinal incision over the third compartment. Dissect the extensor pollicis longus (EPL) tendon and place it in a vessel loop for manipulation.

Elevate the second and fourth dorsal compartments subperiosteally to preserve the integrity of these compartments so there will be no direct contact between the tendons and implants.

On the ulnar side, continue to dissect toward the radial border of the DRUJ, preserving the ligament and joint capsule. On the radial side, dissect toward the brachioradialis tendon, to place the dorsoradial plate correctly to support the radial styloid.

3. Reduce fracture

Begin fixation on the intermediate column with the dorsoulnar plate, adapting it carefully to the surface of the bone. This plate supports the intermediate column and fixes the dorsoulnar fragment. Fix the plate preliminarily with a 2.7 mm cortex screw in the shaft fragment close to the fracture (buttress position).

4. Position dorsoradial plate

For the radial column, position the dorsoradial plate beneath the first compartment to support the radial styloid. Fix it to the bone with a 2.4 mm cortex screw in the shaft, close to the fracture. It should form an angle of approximately 70° to 90° to the dorsoulnar plate. Confirm correct reduction and position of the plates with fluoroscopy.

Alternative technique
The dorsoradial plate may be placed using a separate incision between the first and second extensor compartments. Use caution with the alternative approach to protect branches of the superficial radial nerve in the skin flap. The dorsoulnar plate may be placed through a separate incision into the fifth extensor compartment. The extensor retinaculum over the distal part of the third compartment may be preserved, so that the tendon is guided along its course toward the thumb.

5. Complete fixation

Using two screws in the distal fragment and two screws in the proximal fragment will usually provide sufficient stability.

6. Confirm proper joint reconstruction

Confirm proper joint reconstruction, screw placement, and screw length using multiple C-arm views.

7. Create flap

Create a flap with the extensor retinaculum by pulling it underneath the EPL and suturing it. The extensor retinaculum lies between the EPL and the dorsoulnar plate to avoid direct contact with the structures.

8. Close incision

Use the appropriate method for surgical closure of the incision.